Now let's get to the NOTD (nails of the day). This is my first time using the sponging method (using a cosmetic sponge to dab nail polish on the nails). It turned out very well! I will definitely use this technique a lot. It's very very very fool proof (yes, the 3x very is necessary) and looks amazing.
For this NOTD, I was imitating another blogger's nail art. Look at the pictures and guess what I was trying to achieve! She was going for a starry sky look *highlight the black rectangle for the answer*. I think I kind of achieved the look. It is more sparkly in person so it's a lot prettier in real life.
 |
| Up close look at the thumb |
 |
| NOTD w/ OPI Yoga-ta Get This Blue |
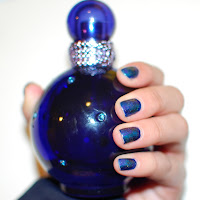
After I finished, I noticed it looks a lotttt like another color scheme I know:
*Picture to the right taken from google images
Yup, it looks like Britbrit's Midnight Fantasy perfume (which I own lol). So even though I was going for the starry sky look, Midnight Fantasy is all I see now >.< !
Quick Steps To How I Did My Nails:
 |
| L - R: OPI Yoga-ta Get This Blue Rimmel Marine Blue Sally Hansen Cyber WnW The Gold and The Beautiful |
1. OPI Yoga-ta Get This Blue (dark blue with purple) as base color, wait until polish is all dried.
2. Dabbed Rimmel Marine Blue (marine blue) in the middle of the nails with cosmetic sponge.
3. Dabbed Sally Hansen Cyber (purple) at the corner of the nails and another part of the nail (small dabs).
4. One coat over whole nail with Wet and Wild The Gold and The Beautiful (I applied heavier strokes at some parts to imitate the milky way).


loves it!
ReplyDelete